...I had a busy weekend.
Despite parts of the UK having temps that were better than Jamaica, the weather over the Bank Holiday weekend wasn't that great - spells of heavy rain & thunder storms made it difficult to plan anything.
On Friday & Saturday the weather wasn't too much of an issue as I had craft classes. However, I really wanted to get my fence at the front of the house stained.
Due to the thunder storm Saturday evening, the fence wood was too wet to apply stain on Sunday so I concentrated on getting the washing & other household chores done. I was lucky, the rain held off until around 4pm so the washing dried and luckier still, the rain didn't last that long.
So Monday, bright & early, I was determined to get the fence done.
I had previously managed to get the front door painted as it is under the cover of the front porch area...
...and as you can see, it is now "Village Green". I used a satin exterior wood finish rather than a wet-look glossy finish.
Several hours later.
The front fence was changed from a tired "Red Cedar" colour to "Forest Green"...
...it looks a bit patchy here as it wasn't completely dry.
I'm very pleased with how it looks...
...and despite the initial doubts...
...I am loving the new colour.
The sky started to cloud over and rain had been forecast so I didn't get to do the front facing side of my back gate but I should get that done next weekend.
Now I just need the rain to hold off long enough so that the grass can get cut................................
Showing posts with label painting. Show all posts
Thursday, 1 June 2017
Tuesday, 18 April 2017
Easter...
...in true British weather style.
The weather forecast for the Easter weekend was not great and in parts of the UK there was even the promise of SNOW. However, in my neck of the woods the temps certainly dropped but we didn't get the terrible rain storms that we had been threatened with.
On the whole, the weather in the UK has been pretty good for the last few weeks but it has taken the day a little while to get going with mornings often dull & chilly.
The other end of the day has been quite muted too.
What warmth there has been during the day has caused many evenings to be hazy/misty...
...but this creates quite a lovely effect when looking at the Sun going down...
...through the shadow of the trees...
...and the colours of the sunset have been quite soft.
The biggest problem I have had this weekend has been trying to decide whether to risk making a start on some more of the outside painting. However, with the forecast for my area being so unfavourable I really didn't want to start on something that would have to be left mid-way. I did consider painting the front door as it is sheltered from the elements but who wants to have all their heating disappearing outside as the door would have needed to stay open whilst the paint dried.
So the Easter weekend has seen nothing in the way of outside décor and to be honest not much has gone on inside either - other than dipping into a few Christmas movies. Yep, you read that right - True Movies had a whole day (Easter Sunday) of Christmas movies...go figure.
No decorating achieved but I did get a lot of crochet done.............................................................
The weather forecast for the Easter weekend was not great and in parts of the UK there was even the promise of SNOW. However, in my neck of the woods the temps certainly dropped but we didn't get the terrible rain storms that we had been threatened with.
On the whole, the weather in the UK has been pretty good for the last few weeks but it has taken the day a little while to get going with mornings often dull & chilly.
The other end of the day has been quite muted too.
What warmth there has been during the day has caused many evenings to be hazy/misty...
...but this creates quite a lovely effect when looking at the Sun going down...
...through the shadow of the trees...
...and the colours of the sunset have been quite soft.
The biggest problem I have had this weekend has been trying to decide whether to risk making a start on some more of the outside painting. However, with the forecast for my area being so unfavourable I really didn't want to start on something that would have to be left mid-way. I did consider painting the front door as it is sheltered from the elements but who wants to have all their heating disappearing outside as the door would have needed to stay open whilst the paint dried.
So the Easter weekend has seen nothing in the way of outside décor and to be honest not much has gone on inside either - other than dipping into a few Christmas movies. Yep, you read that right - True Movies had a whole day (Easter Sunday) of Christmas movies...go figure.
No decorating achieved but I did get a lot of crochet done.............................................................
Tuesday, 30 June 2015
Blue Peter moment...
...sort of!
As a child I would watch Blue Peter and loved to see the things that could be made from washing-up liquid bottles and some 'sticky backed plastic' and that was the thought that sprang to mind when Andy mentioned 'sticky backed canvas' during his demo on Saturday.
However, once he started 'playing' with the canvas, all thoughts of children's TV were a distant memory.
This was one of two pieces that Andy had prepared with the intention of making a book style box...
...however, time had gotten away from him so there was no finished sample but these pieces looked fabulous (my photo really doesn't do it justice).
Taking a sheet of the sticky backed canvas and some Distress Ink pads, Andy blended the colours to create a mottled effect over the sheet...
...and then using some stamps and the same shades of Distress ink - he stamped a random design over the sheet. Once complete...
...he used some white acrylic paint to highlight areas and add to the mottled effect.
The over all effect was lovely and as I have some of this canvas, I will be having a play.......................................................................................
As a child I would watch Blue Peter and loved to see the things that could be made from washing-up liquid bottles and some 'sticky backed plastic' and that was the thought that sprang to mind when Andy mentioned 'sticky backed canvas' during his demo on Saturday.
However, once he started 'playing' with the canvas, all thoughts of children's TV were a distant memory.
This was one of two pieces that Andy had prepared with the intention of making a book style box...
...however, time had gotten away from him so there was no finished sample but these pieces looked fabulous (my photo really doesn't do it justice).
Taking a sheet of the sticky backed canvas and some Distress Ink pads, Andy blended the colours to create a mottled effect over the sheet...
...and then using some stamps and the same shades of Distress ink - he stamped a random design over the sheet. Once complete...
...he used some white acrylic paint to highlight areas and add to the mottled effect.
The over all effect was lovely and as I have some of this canvas, I will be having a play.......................................................................................
Monday, 1 June 2015
What a strange...
..."Members weekend".
Normally I take the Friday as a days leave and meet up with my friend Hilary for a bit of retail therapy when members weekend comes around. However, I had to be a work on Friday because of all my leavers and unfortunately, Hilary couldn't make it on Saturday as she was already booked to be somewhere else.
Joanne said that it had seemed strange seeing Hilary on her own on Friday and instead of the pair of us...shopping...breaking for coffee...shopping...breaking for lunch...and sometimes a bit more shopping...Hilary did her shopping and went home.
I shopped...had lunch...then shopped some more.
However, it isn't quite the same when you are there on your own.
I had wanted a couple of Sue Wilson dies but unfortunately, the solid flower had sold out but I still managed to get some lovely new bits to play with...
...I got the last 'cut-out' version of the Sue Wilson die, a couple of John Lockwood clear stamp sets, most of the Cosmic Shimmer Iridescent Watercolour sets, a load more Ranger re-inkers and a few other bits & bobs.
It wasn't the same being there on my own but at least Hilary & I have a lunch date next weekend so we can catch up........................................................................
Update: I popped into Pinnacles on my way home from Mum's on Sunday afternoon and was lucky enough to pick up the solid Sue Wilson flower die - someone must have had it in their basket and then decided to put it back. I am looking forward to making some time to have a good play with these dies.
Normally I take the Friday as a days leave and meet up with my friend Hilary for a bit of retail therapy when members weekend comes around. However, I had to be a work on Friday because of all my leavers and unfortunately, Hilary couldn't make it on Saturday as she was already booked to be somewhere else.
Joanne said that it had seemed strange seeing Hilary on her own on Friday and instead of the pair of us...shopping...breaking for coffee...shopping...breaking for lunch...and sometimes a bit more shopping...Hilary did her shopping and went home.
I shopped...had lunch...then shopped some more.
However, it isn't quite the same when you are there on your own.
I had wanted a couple of Sue Wilson dies but unfortunately, the solid flower had sold out but I still managed to get some lovely new bits to play with...
...I got the last 'cut-out' version of the Sue Wilson die, a couple of John Lockwood clear stamp sets, most of the Cosmic Shimmer Iridescent Watercolour sets, a load more Ranger re-inkers and a few other bits & bobs.
It wasn't the same being there on my own but at least Hilary & I have a lunch date next weekend so we can catch up........................................................................
Update: I popped into Pinnacles on my way home from Mum's on Sunday afternoon and was lucky enough to pick up the solid Sue Wilson flower die - someone must have had it in their basket and then decided to put it back. I am looking forward to making some time to have a good play with these dies.
Saturday, 28 February 2015
If you saw one of these...
...would you know what it was?
I certainly didn't have a clue but I saw it, loved all the carving and at the back of my mind I had a purpose in mind. It was sitting on the end of the shelf in one of my local charity shops and it caught my eye. When I took it to the cash-desk, the sales assistant asked if I knew what it was and what was I intending to do with it. I said that I didn't know what it was originally for but I was going to use it to store craft glues.
If you don't already know - it is a pipe rack. Pipes as in the smoking kind.
My idea was for the top row to hold some of my Cosmic Shimmer Twinkles...
...as you can see and the bottom shelf...
...holds pots of Creative Expressions Gilding wax.
I need to sand the holes a little so that the bottles sit in a little more securely but I'm really happy with my charity shop find.
I'm not sure whether to leave the wood as it is or perhaps give it a coat of white chalk paint...or just highlight some areas with some gilding wax. I'm thinking perhaps a coat of chalk paint, rubbing back areas that would have worn and then adding a touch of gilding wax to the high points of the design.
I don't know.
Perhaps I'll live with it for a while and see where my thoughts take me - or perhaps you have some ideas?..................................................................
I certainly didn't have a clue but I saw it, loved all the carving and at the back of my mind I had a purpose in mind. It was sitting on the end of the shelf in one of my local charity shops and it caught my eye. When I took it to the cash-desk, the sales assistant asked if I knew what it was and what was I intending to do with it. I said that I didn't know what it was originally for but I was going to use it to store craft glues.
If you don't already know - it is a pipe rack. Pipes as in the smoking kind.
My idea was for the top row to hold some of my Cosmic Shimmer Twinkles...
...as you can see and the bottom shelf...
...holds pots of Creative Expressions Gilding wax.
I need to sand the holes a little so that the bottles sit in a little more securely but I'm really happy with my charity shop find.
I'm not sure whether to leave the wood as it is or perhaps give it a coat of white chalk paint...or just highlight some areas with some gilding wax. I'm thinking perhaps a coat of chalk paint, rubbing back areas that would have worn and then adding a touch of gilding wax to the high points of the design.
I don't know.
Perhaps I'll live with it for a while and see where my thoughts take me - or perhaps you have some ideas?..................................................................
Monday, 23 February 2015
So what was the end result...
...of Andy's "Snap, Crackle & Pop" workshop".
Two decorative boxes.
We started with a nesting pair of hinged wooden boxes...
...and the first task was to unscrew the hinges...
...the larger of the two boxes was given a good coat of white acrylic chalk effect paint...
...inside & out before the PVA was applied and then the silver paint...
...I love this "Pop" or blistered effect that was created with the heat gun.
Gleam Patina blue and Creative Expressions Graceful mint wax...
...were applied to the outside of the box and given a good buffing...
...the whole thing was then given a swipe of Teal Stazon before the hinges were screwed back on.
The smaller box was dismantled before being given a coat of matt black acrylic...
...inside & out. The lid was given a coat of PVA and then the white chalk paint...
...dried with a heat gun and then waxed with Creative Expressions...
...Graceful Peach & Graceful Mustard.
Once home, the metal looking box...
...was put to use...
...another hiding place for sweeties.
I love the way the two boxes have turned out...
...and I am going to keep the bottom of the small box plain black...
...as this gives it a chalkboard look. I have some embellishment ideas for this box but those are for sharing another day.
Saturday's workshop was a fabulous day of play/experimenting/getting messy and having lots of fun.
Thank you so much Andy - Hilary & I had a wonderful time........................................................
Two decorative boxes.
We started with a nesting pair of hinged wooden boxes...
...and the first task was to unscrew the hinges...
...the larger of the two boxes was given a good coat of white acrylic chalk effect paint...
...inside & out before the PVA was applied and then the silver paint...
...I love this "Pop" or blistered effect that was created with the heat gun.
Gleam Patina blue and Creative Expressions Graceful mint wax...
...were applied to the outside of the box and given a good buffing...
...the whole thing was then given a swipe of Teal Stazon before the hinges were screwed back on.
The smaller box was dismantled before being given a coat of matt black acrylic...
...inside & out. The lid was given a coat of PVA and then the white chalk paint...
...dried with a heat gun and then waxed with Creative Expressions...
...Graceful Peach & Graceful Mustard.
Once home, the metal looking box...
...was put to use...
...another hiding place for sweeties.
I love the way the two boxes have turned out...
...and I am going to keep the bottom of the small box plain black...
...as this gives it a chalkboard look. I have some embellishment ideas for this box but those are for sharing another day.
Saturday's workshop was a fabulous day of play/experimenting/getting messy and having lots of fun.
Thank you so much Andy - Hilary & I had a wonderful time........................................................
Sunday, 22 February 2015
I think it's time...
...you were introduced to Andy Pearson.
Andy & his family own and run Pinnacle Crafts which is located within the Barleylands Craft Village in Essex. This is Andy...
...demonstrating a technique that formed part of yesterday's "Snap, Crackle & Pop" workshop.
Andy holds a number of Saturday, all day workshops throughout the year and they are always fun and a great place to try new techniques or have a play with ones you may not have used for a while. Andy also does a number of Demo Days each year where he will take some crafting items and show you how to think outside the box so that you get even more use from your products - the next demo day is on 28 Feb 2015 and will be showing how to get the most out of your WeRMemory Keepers Punch & Score boards.
Andy was on the design team for Cuttlebug but is now a member of the DT for Creative Expressions and you can see his work over on their blog every Wednesday. A day they keep for the boys on their DT (some other Creative Expressions names you may be familiar with...John Lockwood,Sue Wilson, Phill Martin). Andy has a blog linked to the shop and a crafting Facebook page - details can be found on the Pinnacles site here.
So now you have met Andy, this is what we did yesterday (lots of photos so you might want to grab a cuppa)...
Starting off with some 4x4 squares of greyboard...
...these were to be our practice pieces...
...the first square was given a coat of black acrylic paint and dried off with a heat gun...
...the square was then given a good coat of PVA glue (we used Cosmic Shimmer but any brand would give the same results). This coat was given a quick blast with the heat gun just to create a 'skin' before a coat of white acrylic Chalk paint was brushed carefully over the top...
...this was dried with the heat gun and as you can see - lots of lovely cracks and texture.
Creative Expressions gilding wax in Graceful blue and Graceful Mustard was applied...
...and buffed to a sheen before some Stazon in Azure...
...was swiped over the top. We were then left toplay experiment...
...different coloured paints. Gilding wax colours applied in different orders...
...mixtures of Stazon colours...
...all created some very...
...different looks...
...even though the base coat had been black.
I then tried some pieces where the base was white...
...and also wanted to try some metallic acrylic paints...
...the top coat on these was silver...
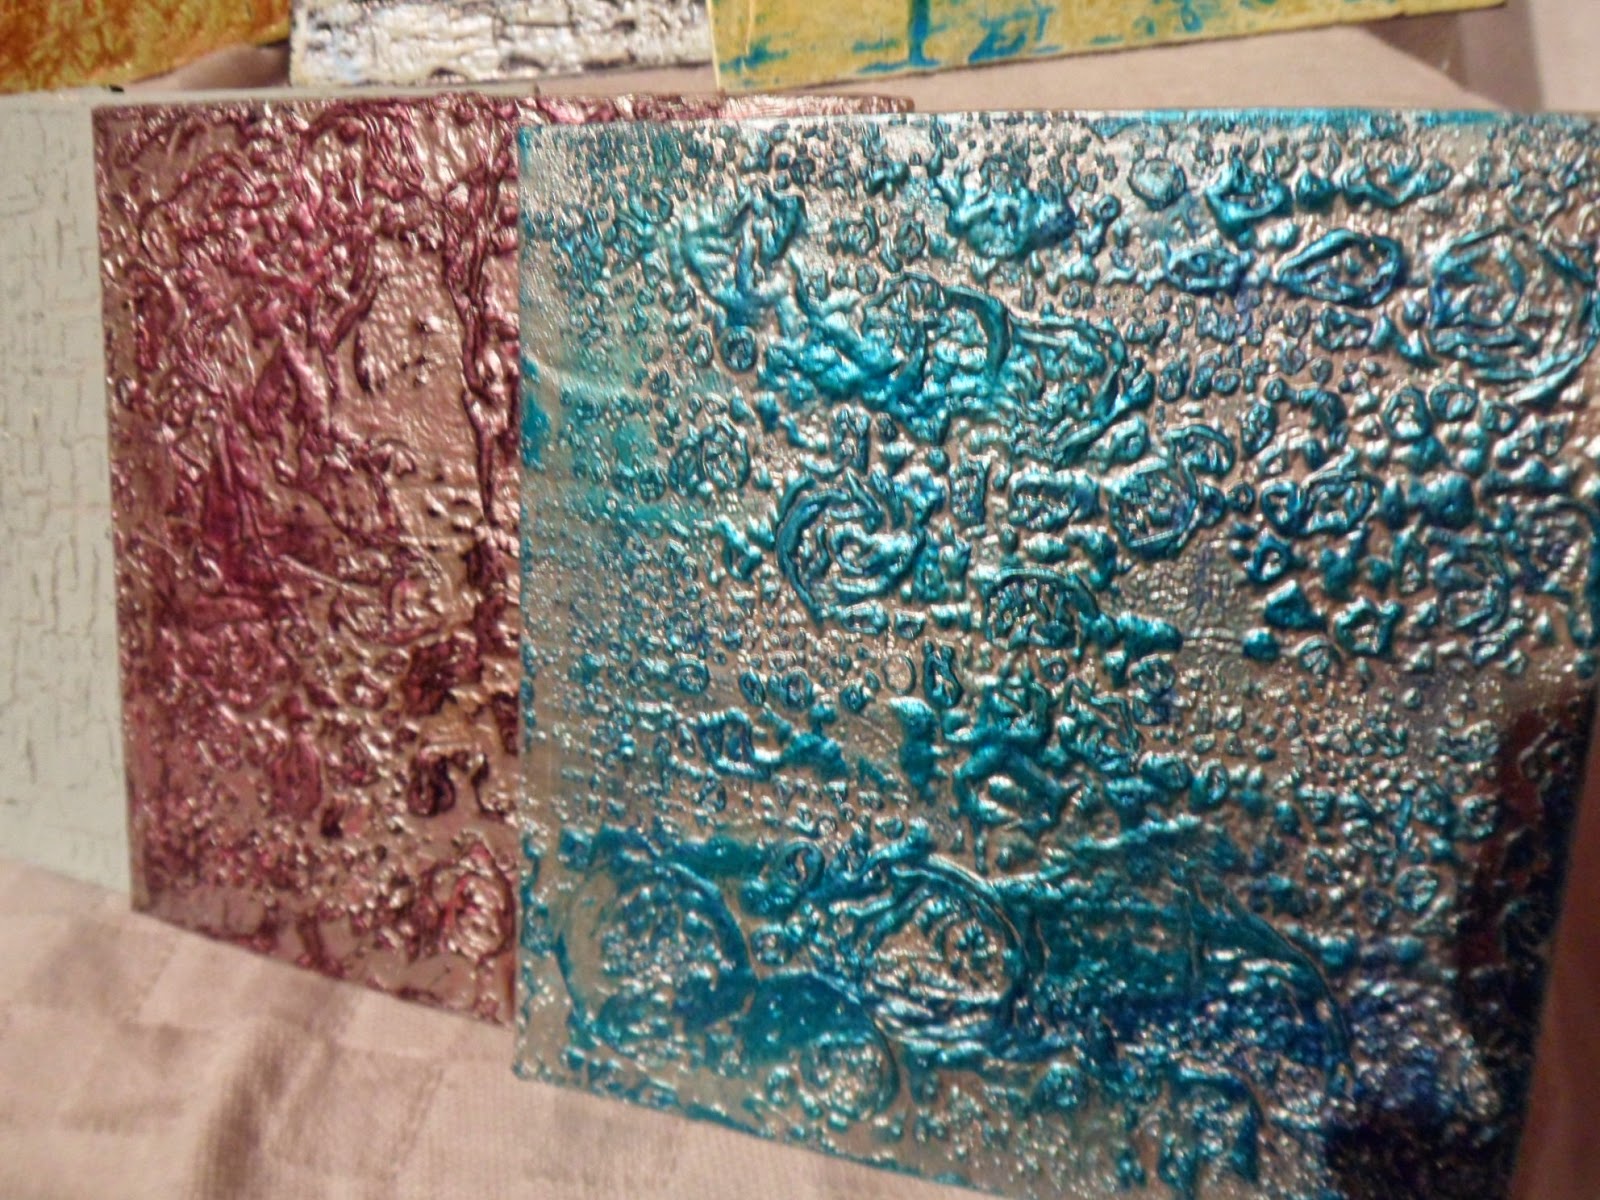
...and as you can see. Instead of 'crackle' this is where the 'pop' came into things. The panels bubbled and created a fabulous texture.
This square was white base with Sea Spray (light mint green) as a top coat...
...it cracked beautifully but wasn't easily noticeable...
...so I tried the same top colour over a black base - much more dramatic.
Once the silver painted panels had cooled...
...one was waxed with Gleam Patina Blue and Creative Expressions Graceful Mint before being swiped with Teal Stazon. The other panel...
...was waxed with Gleam Cerise and Rich Copper. I used two colours of Stazon on this one...
...Black and Cherry Red.
These are all the panels photographed together once I got them home...
...I'm not sure what I'm going to do with these. I may make a canvas display to show them off or I might use them as backgrounds for some mini hangings. Something I need to give some thought to.
That was all the experimenting but if you pop back tomorrow, I'll show you what I did with the techniques.........................................................
Andy & his family own and run Pinnacle Crafts which is located within the Barleylands Craft Village in Essex. This is Andy...
...demonstrating a technique that formed part of yesterday's "Snap, Crackle & Pop" workshop.
Andy holds a number of Saturday, all day workshops throughout the year and they are always fun and a great place to try new techniques or have a play with ones you may not have used for a while. Andy also does a number of Demo Days each year where he will take some crafting items and show you how to think outside the box so that you get even more use from your products - the next demo day is on 28 Feb 2015 and will be showing how to get the most out of your WeRMemory Keepers Punch & Score boards.
Andy was on the design team for Cuttlebug but is now a member of the DT for Creative Expressions and you can see his work over on their blog every Wednesday. A day they keep for the boys on their DT (some other Creative Expressions names you may be familiar with...John Lockwood,Sue Wilson, Phill Martin). Andy has a blog linked to the shop and a crafting Facebook page - details can be found on the Pinnacles site here.
So now you have met Andy, this is what we did yesterday (lots of photos so you might want to grab a cuppa)...
Starting off with some 4x4 squares of greyboard...
...these were to be our practice pieces...
...the first square was given a coat of black acrylic paint and dried off with a heat gun...
...the square was then given a good coat of PVA glue (we used Cosmic Shimmer but any brand would give the same results). This coat was given a quick blast with the heat gun just to create a 'skin' before a coat of white acrylic Chalk paint was brushed carefully over the top...
...this was dried with the heat gun and as you can see - lots of lovely cracks and texture.
Creative Expressions gilding wax in Graceful blue and Graceful Mustard was applied...
...and buffed to a sheen before some Stazon in Azure...
...was swiped over the top. We were then left to
...different coloured paints. Gilding wax colours applied in different orders...
...mixtures of Stazon colours...
...all created some very...
...different looks...
...even though the base coat had been black.
I then tried some pieces where the base was white...
...and also wanted to try some metallic acrylic paints...
...the top coat on these was silver...
...and as you can see. Instead of 'crackle' this is where the 'pop' came into things. The panels bubbled and created a fabulous texture.
This square was white base with Sea Spray (light mint green) as a top coat...
...it cracked beautifully but wasn't easily noticeable...
...so I tried the same top colour over a black base - much more dramatic.
Once the silver painted panels had cooled...
...one was waxed with Gleam Patina Blue and Creative Expressions Graceful Mint before being swiped with Teal Stazon. The other panel...
...was waxed with Gleam Cerise and Rich Copper. I used two colours of Stazon on this one...
...Black and Cherry Red.
These are all the panels photographed together once I got them home...
...I'm not sure what I'm going to do with these. I may make a canvas display to show them off or I might use them as backgrounds for some mini hangings. Something I need to give some thought to.
That was all the experimenting but if you pop back tomorrow, I'll show you what I did with the techniques.........................................................
Subscribe to:
Posts (Atom)