Followers

Thursday, 11 November 2010

Another 11th hour of the 11th day...

...of the 11th month is soon to be upon us.

I found this lovely poppy picture whilst browsing the 'Net and thought it would be just right to represent Remembrance Day.


I will be paying my respects at 11am today and will not only be thinking of all those brave souls who have fallen protecting this Nation but also all those lads & lasses who are continuing to lay their lives on the line.

"and in the morning; we will remember them"...........................

Sunday, 7 November 2010

A more grown-up version...

...of the calendar from Wednesday's class.

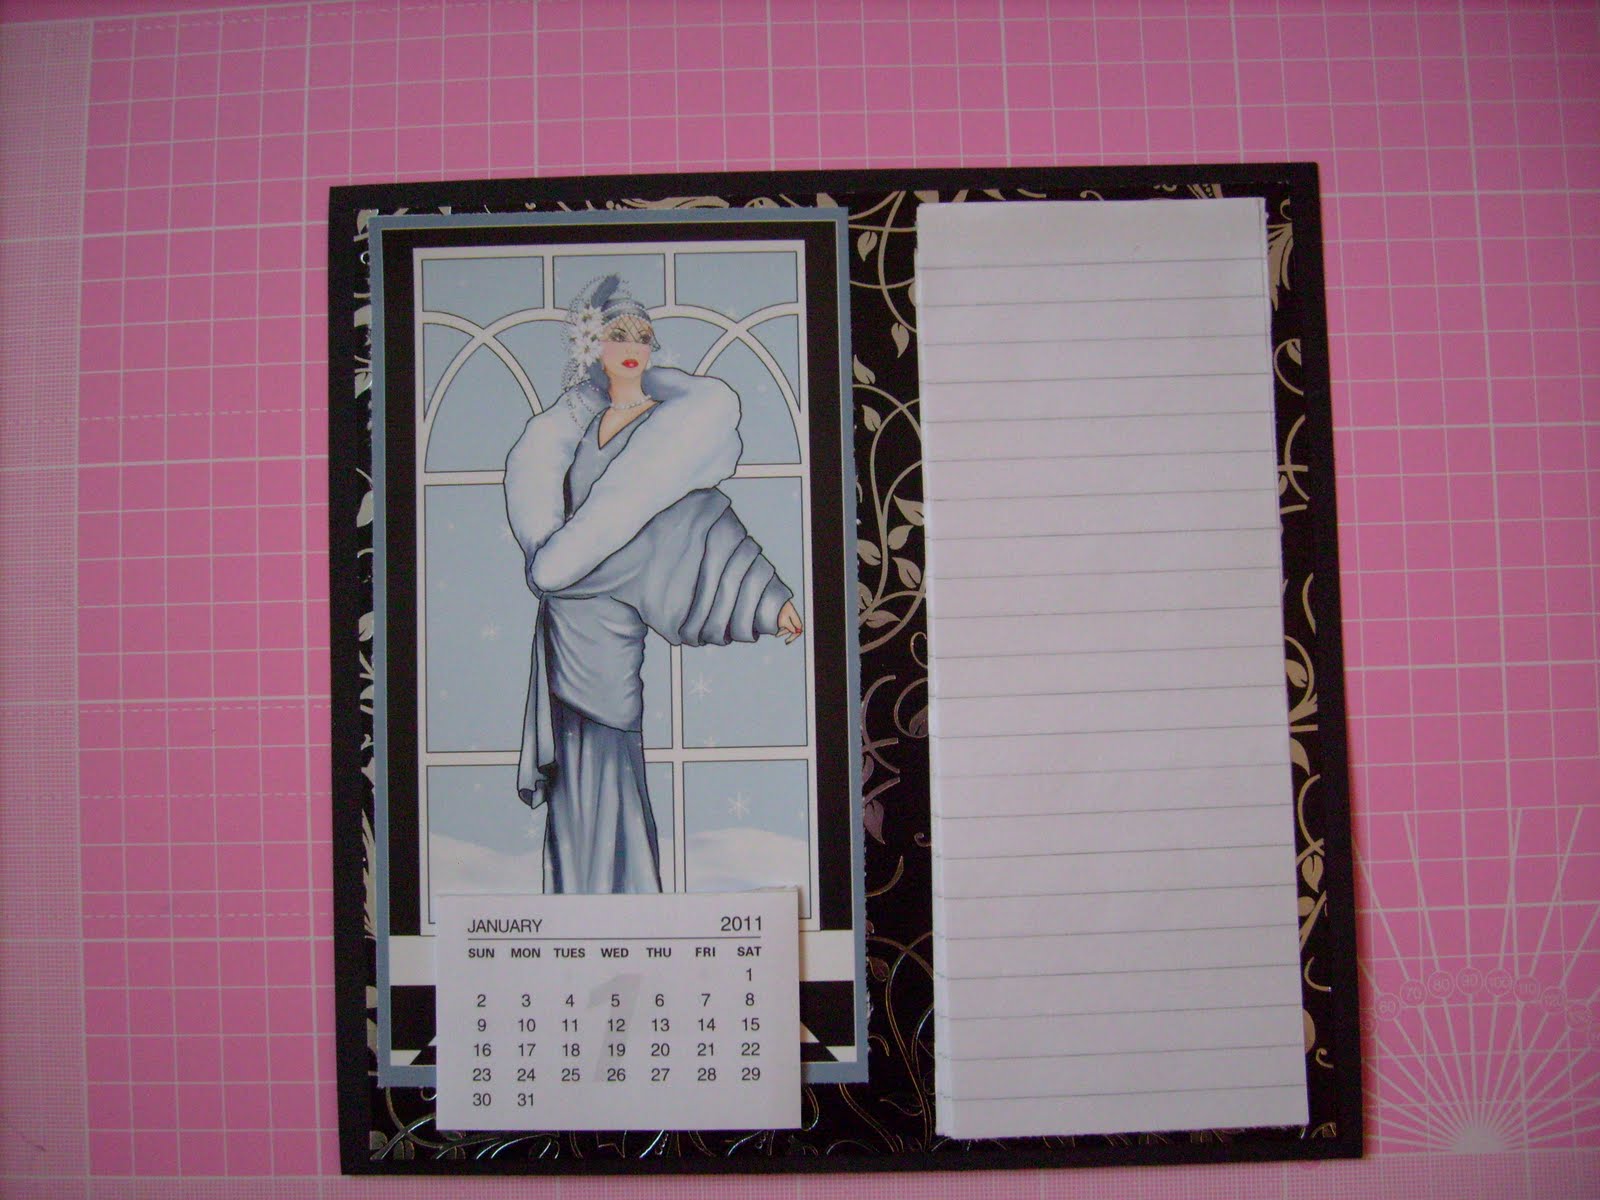
As I said in my earlier post, I loved the idea but the style of the calendar I made in class was a little too cute for me so I have come up with my own version. Here are some brief instructions for anyone interested in having a go.

The materials used were; 1 sheet of A4 black card, 1 sheet of A4 silver foiled black card, images from a Deco lady decoupage/topper sheet, piece of ribbon, slimline note paper and a purse-size calendar.
I have found that different brands of paper/card despite claiming to be standard A4 all seem to vary a bit measurement-wise so for these instructions I will not give any specific measurements. I measured the short end of my A4 card and then measured the same distance along the long side - scored and folded so that I would have a square.
The foiled card was cut to provide a square for the front and a panel for the back. The notepaper was cut down to fit and the "Deco" images cut out.
The back of the calendar has a pocket made from the flap created by the scored fold. This was stuck down using Redline DST (very strong) at each side and the panel of foiled card was stuck on using DST to decorate and add a bit of strength to the pocket. The panel was cut to leave just a small black border. The small Deco topper was stuck on - to one side just as a decorative accent. The remaining narrow strip of foiled card was stuck across the top to hide where the ribbon for hanging is attached. Again, this is slightly smaller than the black card so is attached leaving a small border from the top and sides.
The front of the calendar has a square of the foiled card attached with DST - this is slightly smaller than the black base card so there is a tiny border all the way around. Leaving a small border of the foiled card to the top/bottom/right side, the notepad was attached. The larger Deco image was attached leaving a small foiled card border to the top & left side (ensuring the top edges of the image & the notepad line-up evenly). The calendar was then attached with DST at the bottom of the image - leaving a small border of foiled card showing at tne bottom.

And there you have it...a bit more grown-up but still quick and easy to make and could be made with little effort to help with sales for the Christmas fayres. Hope you like........................

Saturday...

...Tim Holtz day.

Andy always makes his classes fun and yesterday he had rather a big class for the amount of stuff he had lined up for us to do. As a result we had the fun of cutting out a lot of the pieces needed ourselves...fun and slight chaos as dies/cuttlebugs and A/B/C plates got passed around the class.

Although we made the wreath first, I thought I would show you the tags to start with as they are very much a 'work in progress'. There was lots of inking & embossing involved but they were intended just to give folks a chance to play with some of the "Tim" type techniques.
I think some of my tags will need backing as the embossing folders were a little harsh on the PP used (from Tim Holtz Holiday stack) and won't stand up to much decorating otherwise. I will link them all together with a book ring when finished.

The wreath involved lots of inking, die cutting and embossing before construction could even start to take place.

We used a 7 petal 'poinsettia type' Nestie for the flowers - cutting them out of Grunge paper and then colouring them before embossing them to give texture (doesn't really show in the photos). With 12 folk in the class each needing 8 flowers that was a lot of cutting so we kept to a single layer but the flowers could have been more detailed with an extra layer if required (a couple of ladies decided to make do with just 4 flowers so that they could double layer them).
The leaves were cut from Bazzill bling using the Tattered Leaves die. Again, 8 cuts per person were required so that we each had 8 of the 3 different leaves on the die. These were then inked to 'distress' and give a bit of tone before being curled over the edge of the table to give more dimension.

I thought about adding some more leaves and some ribbon when I got home but seeing it actually hanging on the door I'm quite happy with it as it is.
This angled close up might not be as clear as I would like but it does show how much depth there is to this project...Pinflair glue is marvelous for these occasions.

I really like this wreath idea and I have loads of ideas buzzing round my head of how I could adapt this...I just need to find some more time....................

A Cybercrop...

...is a coming!!!

Note your diaries, the next UKS CC is on 3/4/5 December - oh what fun............

Wednesday class...

...the calendar.

Pauline (Andy's mum) took the class and the idea was to make something quick & easy that could also be used as a gift. This idea was certainly quick and the result is a useful calendar.
Although the basic construction was quick we also got to play with the new dies from the DoCraft "Woodland" range. This bit was time consuming. The results from the dies are beautifully cute but there are just so many 'bits' to put together - many of which are very tiny and fiddly. I decided to use the hedgehog although I still think it looks like a teddy being hugged by something big and furry LOL
The back of the calendar has a pocket for holding a few general cards - great to have them to hand for those last minute occasions that you have 'almost' forgotten.

With the Christmas season approaching at a rate of knots this idea would be great for the kids to make as gifts for teachers or items to sell at their school/Brownie etc. Christmas fayre. Perhaps a pretty pic or a bit of decoupage would be easier for them and certainly a lot less fiddly - but something to be considered.

I liked the basic idea so I've cut out some bits to make my own take on this...I'll try and take some step-by-step pics later today..................

Saturday, 6 November 2010

Lucky me...

...I attended two classes this week.

On Wednesday I attended a calendar making class at Pinnacles (couple of hours) and came away with a completed hanging calendar and a card - the format has given me some ideas so I'm currently putting together my own take on this.

Today was a full day of Tim Holtz style playing with an 'Andy' twist. Fab, fab day and veeeeeeeeeeeeeery messy LOL

We made grunge paper poinsettia flowers, coloured them with Adirondack inks and blinged them up a bit with embossing and the new gold Flower soft. Cut loads of 'tattered leaves' out of Bazzill bling and distressed them a bit with ink - then made the whole thing into a Christmas wreath.

We also got to have a play along the lines of "Tim's"...12 Tags of Christmas. We got to play with tags so that we could see the effects that embossing, inking and distressing can have on PP & CS as well as acetate.

A very busy day today - and as promised, very messy but I went prepared with my apron & gloves.

Hopefully the light will be fine tomorrow to take pics of the projects as they are but the wreath and tags are a work in progress and I'll have to come back at a later point with the finished goods.

Another class next Wednesday - Fantasy Film - we warned Andy that we weren't going to be doing his ironing (crafters don't "do" ironing, now do they - be honest LOL) so he shouldn't even go there......................

Friday, 5 November 2010

Oooo, Candy alert...

...quick, go look see.

The lovely Lynn over at Trash to Treasure is celebrating 2 years of blogging with a lovely giveaway - I won't post a pic here of all the lush loveliness up for grabs as you really do need to go look for yourselves................