...of Andy's "Snap, Crackle & Pop" workshop".
Two decorative boxes.
We started with a nesting pair of hinged wooden boxes...
...and the first task was to unscrew the hinges...
...the larger of the two boxes was given a good coat of white acrylic chalk effect paint...
...inside & out before the PVA was applied and then the silver paint...
...I love this "Pop" or blistered effect that was created with the heat gun.
Gleam Patina blue and Creative Expressions Graceful mint wax...
...were applied to the outside of the box and given a good buffing...
...the whole thing was then given a swipe of Teal Stazon before the hinges were screwed back on.
The smaller box was dismantled before being given a coat of matt black acrylic...
...inside & out. The lid was given a coat of PVA and then the white chalk paint...
...dried with a heat gun and then waxed with Creative Expressions...
...Graceful Peach & Graceful Mustard.
Once home, the metal looking box...
...was put to use...
...another hiding place for sweeties.
I love the way the two boxes have turned out...
...and I am going to keep the bottom of the small box plain black...
...as this gives it a chalkboard look. I have some embellishment ideas for this box but those are for sharing another day.
Saturday's workshop was a fabulous day of play/experimenting/getting messy and having lots of fun.
Thank you so much Andy - Hilary & I had a wonderful time........................................................
Monday, 23 February 2015
Sunday, 22 February 2015
I think it's time...
...you were introduced to Andy Pearson.
Andy & his family own and run Pinnacle Crafts which is located within the Barleylands Craft Village in Essex. This is Andy...
...demonstrating a technique that formed part of yesterday's "Snap, Crackle & Pop" workshop.
Andy holds a number of Saturday, all day workshops throughout the year and they are always fun and a great place to try new techniques or have a play with ones you may not have used for a while. Andy also does a number of Demo Days each year where he will take some crafting items and show you how to think outside the box so that you get even more use from your products - the next demo day is on 28 Feb 2015 and will be showing how to get the most out of your WeRMemory Keepers Punch & Score boards.
Andy was on the design team for Cuttlebug but is now a member of the DT for Creative Expressions and you can see his work over on their blog every Wednesday. A day they keep for the boys on their DT (some other Creative Expressions names you may be familiar with...John Lockwood,Sue Wilson, Phill Martin). Andy has a blog linked to the shop and a crafting Facebook page - details can be found on the Pinnacles site here.
So now you have met Andy, this is what we did yesterday (lots of photos so you might want to grab a cuppa)...
Starting off with some 4x4 squares of greyboard...
...these were to be our practice pieces...
...the first square was given a coat of black acrylic paint and dried off with a heat gun...
...the square was then given a good coat of PVA glue (we used Cosmic Shimmer but any brand would give the same results). This coat was given a quick blast with the heat gun just to create a 'skin' before a coat of white acrylic Chalk paint was brushed carefully over the top...
...this was dried with the heat gun and as you can see - lots of lovely cracks and texture.
Creative Expressions gilding wax in Graceful blue and Graceful Mustard was applied...
...and buffed to a sheen before some Stazon in Azure...
...was swiped over the top. We were then left toplay experiment...
...different coloured paints. Gilding wax colours applied in different orders...
...mixtures of Stazon colours...
...all created some very...
...different looks...
...even though the base coat had been black.
I then tried some pieces where the base was white...
...and also wanted to try some metallic acrylic paints...
...the top coat on these was silver...
...and as you can see. Instead of 'crackle' this is where the 'pop' came into things. The panels bubbled and created a fabulous texture.
This square was white base with Sea Spray (light mint green) as a top coat...
...it cracked beautifully but wasn't easily noticeable...
...so I tried the same top colour over a black base - much more dramatic.
Once the silver painted panels had cooled...
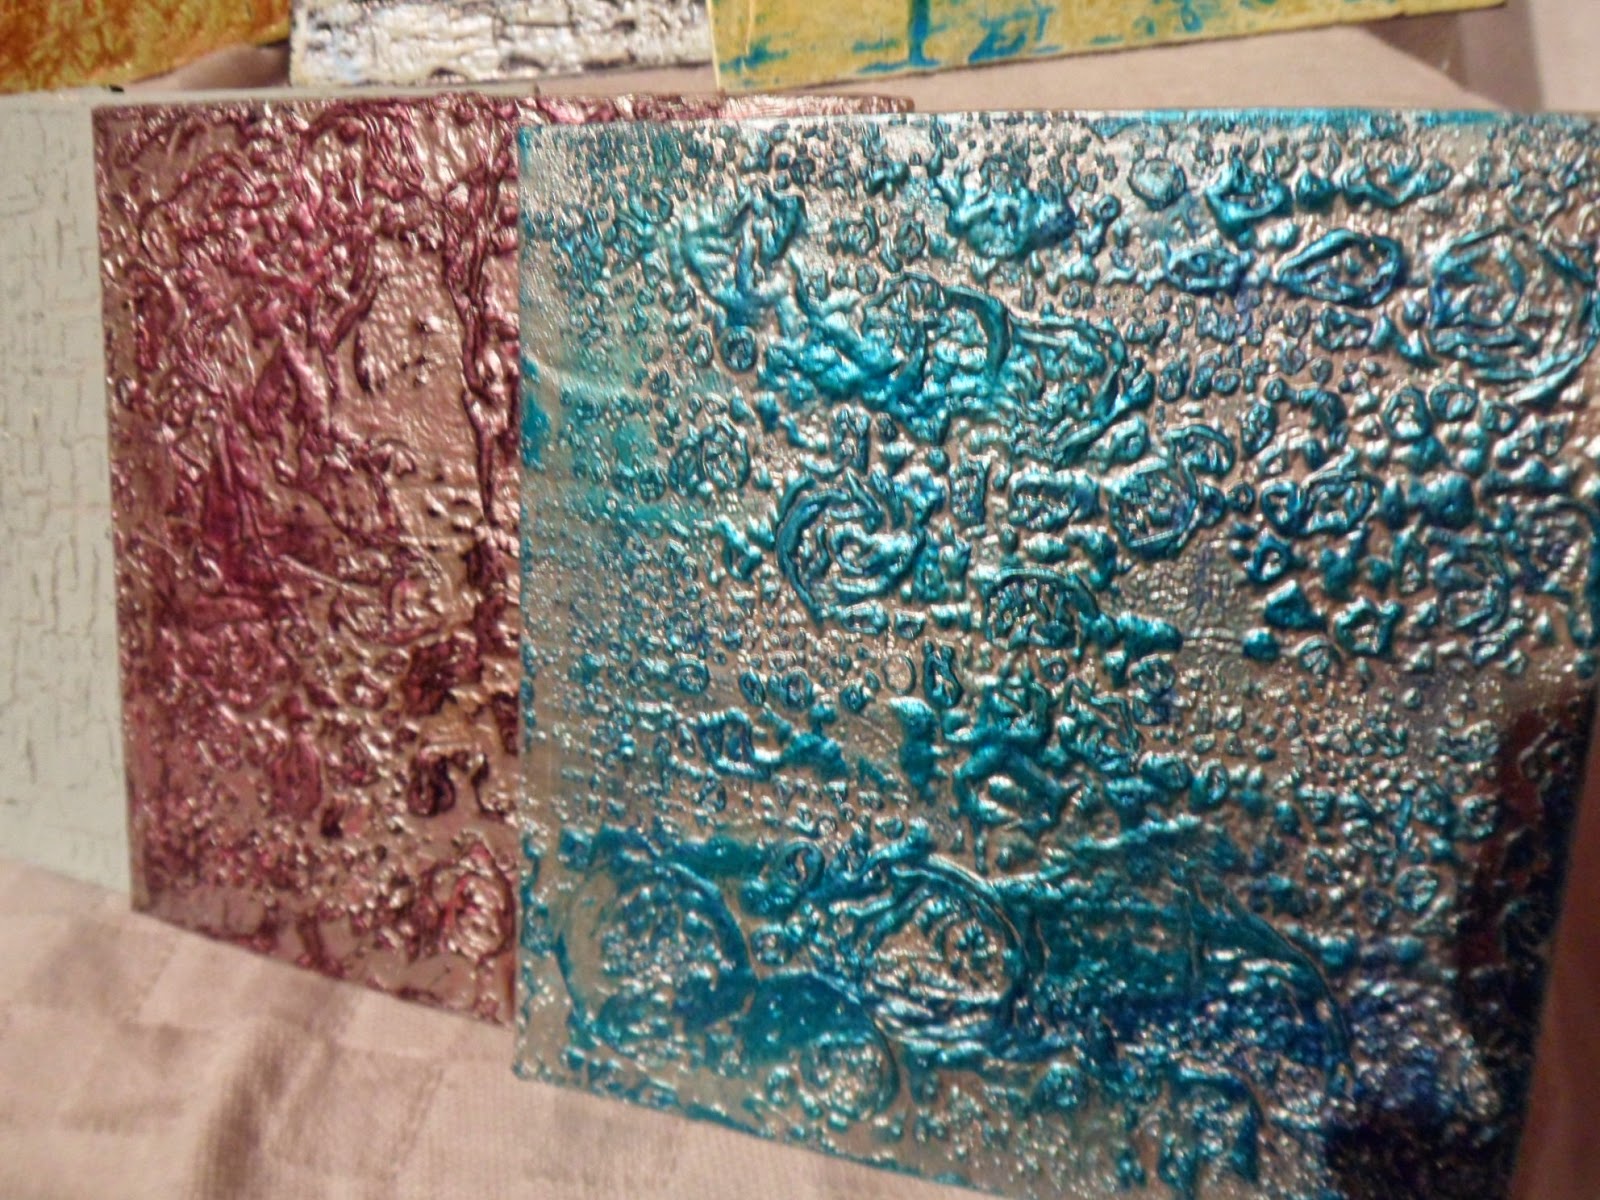
...one was waxed with Gleam Patina Blue and Creative Expressions Graceful Mint before being swiped with Teal Stazon. The other panel...
...was waxed with Gleam Cerise and Rich Copper. I used two colours of Stazon on this one...
...Black and Cherry Red.
These are all the panels photographed together once I got them home...
...I'm not sure what I'm going to do with these. I may make a canvas display to show them off or I might use them as backgrounds for some mini hangings. Something I need to give some thought to.
That was all the experimenting but if you pop back tomorrow, I'll show you what I did with the techniques.........................................................
Andy & his family own and run Pinnacle Crafts which is located within the Barleylands Craft Village in Essex. This is Andy...
...demonstrating a technique that formed part of yesterday's "Snap, Crackle & Pop" workshop.
Andy holds a number of Saturday, all day workshops throughout the year and they are always fun and a great place to try new techniques or have a play with ones you may not have used for a while. Andy also does a number of Demo Days each year where he will take some crafting items and show you how to think outside the box so that you get even more use from your products - the next demo day is on 28 Feb 2015 and will be showing how to get the most out of your WeRMemory Keepers Punch & Score boards.
Andy was on the design team for Cuttlebug but is now a member of the DT for Creative Expressions and you can see his work over on their blog every Wednesday. A day they keep for the boys on their DT (some other Creative Expressions names you may be familiar with...John Lockwood,Sue Wilson, Phill Martin). Andy has a blog linked to the shop and a crafting Facebook page - details can be found on the Pinnacles site here.
So now you have met Andy, this is what we did yesterday (lots of photos so you might want to grab a cuppa)...
Starting off with some 4x4 squares of greyboard...
...these were to be our practice pieces...
...the first square was given a coat of black acrylic paint and dried off with a heat gun...
...the square was then given a good coat of PVA glue (we used Cosmic Shimmer but any brand would give the same results). This coat was given a quick blast with the heat gun just to create a 'skin' before a coat of white acrylic Chalk paint was brushed carefully over the top...
...this was dried with the heat gun and as you can see - lots of lovely cracks and texture.
Creative Expressions gilding wax in Graceful blue and Graceful Mustard was applied...
...and buffed to a sheen before some Stazon in Azure...
...was swiped over the top. We were then left to
...different coloured paints. Gilding wax colours applied in different orders...
...mixtures of Stazon colours...
...all created some very...
...different looks...
...even though the base coat had been black.
I then tried some pieces where the base was white...
...and also wanted to try some metallic acrylic paints...
...the top coat on these was silver...
...and as you can see. Instead of 'crackle' this is where the 'pop' came into things. The panels bubbled and created a fabulous texture.
This square was white base with Sea Spray (light mint green) as a top coat...
...it cracked beautifully but wasn't easily noticeable...
...so I tried the same top colour over a black base - much more dramatic.
Once the silver painted panels had cooled...
...one was waxed with Gleam Patina Blue and Creative Expressions Graceful Mint before being swiped with Teal Stazon. The other panel...
...was waxed with Gleam Cerise and Rich Copper. I used two colours of Stazon on this one...
...Black and Cherry Red.
These are all the panels photographed together once I got them home...
...I'm not sure what I'm going to do with these. I may make a canvas display to show them off or I might use them as backgrounds for some mini hangings. Something I need to give some thought to.
That was all the experimenting but if you pop back tomorrow, I'll show you what I did with the techniques.........................................................
Monday, 16 February 2015
Got a bit...
...side-tracked.
I have the body of my "Verona" storage cabinet all glued together and ready for painting...
...but I had run out of paint because I got distracted by this...
...an MDF unit from Creative Expressions that will hold my glues and glitters.
It went together in no time at all and I thought I would 'crackle' it...
...the crackle medium that I used isn't one I had used before (Artiste) and I don't think I put a thick enough coat on. I know I let everything dry properly, so that wasn't the problem...
...but there wasn't a lot of cracking going on. What did happen was that I used the last of my paint so had to ask Joanne at Pinnacle Crafts if she would kindly order in some more so that I can finish off the Verona cabinet (she did and I picked it up Saturday).
I think I might give this unit a bit of a spritz with some of my Distress Spray Stains.
In the meantime, I'd better get the body of the 'Verona' painted so that I can attach the PP panels and get it finished.
I really must stop getting distracted like this...I wonder if the Distress Ink Pad storage takes long to put together...no; I must stick to these and get them finished...but those other cabinets are oh, so tempting.........................................................................
I have the body of my "Verona" storage cabinet all glued together and ready for painting...
...but I had run out of paint because I got distracted by this...
...an MDF unit from Creative Expressions that will hold my glues and glitters.
It went together in no time at all and I thought I would 'crackle' it...
...the crackle medium that I used isn't one I had used before (Artiste) and I don't think I put a thick enough coat on. I know I let everything dry properly, so that wasn't the problem...
...but there wasn't a lot of cracking going on. What did happen was that I used the last of my paint so had to ask Joanne at Pinnacle Crafts if she would kindly order in some more so that I can finish off the Verona cabinet (she did and I picked it up Saturday).
I think I might give this unit a bit of a spritz with some of my Distress Spray Stains.
In the meantime, I'd better get the body of the 'Verona' painted so that I can attach the PP panels and get it finished.
I really must stop getting distracted like this...I wonder if the Distress Ink Pad storage takes long to put together...no; I must stick to these and get them finished...but those other cabinets are oh, so tempting.........................................................................
Sunday, 15 February 2015
There are days...
...when nothing turns out how you pictured it.
I needed to get my Mum's birthday card sorted ready to be able to take it with me today so that she would have it to open on the day (Friday 20 February). I made two cards but neither looked 'right' so Saturday I headed over to Barleylands for some inspiration.
The two cards I had tried were in Mum's favourite colour; blue. However, when that didn't work I started looking for other things that I know she likes.
Mum has a thing about owls...I think it harks back to when she was a "Brown Owl" (leader of a Brownie pack)...and she has a collection of ornaments in glass, china, metal, stoneware and a number of pieces of jewellery.
I wandered around for some time but kept coming back to a "Sweet Dixie" die set called "Owl & Branch 2"...it ended up coming home with me.
The die is very detailed and took a couple of passes through my Big Shot to ensure that it was cut and then I passed it through to emboss it - I love it.
I was in two minds as to the colour scheme for the card but settled on this...
...the card base is 6x6 black Bazzill and the die-cut frame is a coated black CS from Papermania. The owl was die-cut from kraft CS. I added some strands of burlap tied down the spine of the card.
As you can see...
...the embossed detail on this owl is fabulous and I love how the kraft colour stands out from the black background.
I didn't put any sentiment on the front of the card as this will allow Mum to frame it and add it to her owl collection. I also don't have to worry about sharing this on here as Mum doesn't blog or use any form of social media.
Hope she likes it.....................................................................
I needed to get my Mum's birthday card sorted ready to be able to take it with me today so that she would have it to open on the day (Friday 20 February). I made two cards but neither looked 'right' so Saturday I headed over to Barleylands for some inspiration.
The two cards I had tried were in Mum's favourite colour; blue. However, when that didn't work I started looking for other things that I know she likes.
Mum has a thing about owls...I think it harks back to when she was a "Brown Owl" (leader of a Brownie pack)...and she has a collection of ornaments in glass, china, metal, stoneware and a number of pieces of jewellery.
I wandered around for some time but kept coming back to a "Sweet Dixie" die set called "Owl & Branch 2"...it ended up coming home with me.
The die is very detailed and took a couple of passes through my Big Shot to ensure that it was cut and then I passed it through to emboss it - I love it.
I was in two minds as to the colour scheme for the card but settled on this...
...the card base is 6x6 black Bazzill and the die-cut frame is a coated black CS from Papermania. The owl was die-cut from kraft CS. I added some strands of burlap tied down the spine of the card.
As you can see...
...the embossed detail on this owl is fabulous and I love how the kraft colour stands out from the black background.
I didn't put any sentiment on the front of the card as this will allow Mum to frame it and add it to her owl collection. I also don't have to worry about sharing this on here as Mum doesn't blog or use any form of social media.
Hope she likes it.....................................................................
Thursday, 12 February 2015
Here's one challenge...
...I had no problems achieving.
I'm sure most of you know by now that I am a bit of a coffee-pot. My day doesn't start until I've had my coffee.
A couple of weeks ago, Starbucks invited me to take part in their "Star Dash Challenge" - depending on the number of stars you earned over a fixed period, you could win additional stars to boost your balance towards free drinks.
Well this was a "no brainer" as I buy a coffee most days on my way into the office - so I signed up.

Although I rarely have access to a Starbucks over the weekend, which limits the number of days that I could actually take part in the "Dash", I managed to complete the lower level and earned myself an extra free drink.
Yep, I know it's a marketing ploy but I would have bought the coffees anyway so this way I gain. Now what should I choose? Me thinks an extra large Gingerbread Latte with cream could be looming in my not too distant future.........................................................................................
I'm sure most of you know by now that I am a bit of a coffee-pot. My day doesn't start until I've had my coffee.
A couple of weeks ago, Starbucks invited me to take part in their "Star Dash Challenge" - depending on the number of stars you earned over a fixed period, you could win additional stars to boost your balance towards free drinks.
Well this was a "no brainer" as I buy a coffee most days on my way into the office - so I signed up.
Although I rarely have access to a Starbucks over the weekend, which limits the number of days that I could actually take part in the "Dash", I managed to complete the lower level and earned myself an extra free drink.
Yep, I know it's a marketing ploy but I would have bought the coffees anyway so this way I gain. Now what should I choose? Me thinks an extra large Gingerbread Latte with cream could be looming in my not too distant future.........................................................................................
Wednesday, 4 February 2015
The Snow came...
...and just as quickly - went!
I woke up Tuesday morning to a dusting of snow all over the back garden, driveway & car but at the front of the house all there was was a small patch on the path - not a flake to be seen on the grass or the pavement on my side of the road. A glance across the road showed the pavement and front gardens covered in a good dusting of the stuff...obviously to do with the direction the wind was blowing.
Before the 2012 Olympics all the stations on my branch-line had the platforms extended so they could accommodate 12 coach trains (???) we don't have any 12 coach services. As a result, the staff only clear the platforms of snow up to the 8 coach point...
...and this was the faint dusting of the white stuff that was left.
As my train passes through a lot of farmland, I tried to get a photo of the fields as some had snow & others didn't...
...the driver suddenly put on a spurt of speed and a tree got in the way on this one.
I did manage to get a picture of a covered field...
...but looking out from the train it was like looking at a patchwork quilt because there seemed no reason why some fields were covered and others weren't.
The lovely Virginia sent me some 12x12 Gilded Winter PPs so that I will be able to finish my storage box without faffing about trying to piece the 8x8 or 6x6 PPs that I have on the larger panels. She posted them on Monday and they were sitting waiting for me when I got home - hidden behind a pile of empty flower tubs. The pizza box contained a lovely selection of the PPs which will be perfect and it also contained this...
...isn't he the most fun piece of happy mail. I love my quirky, whacky bird - thank you so much Virginia, he is sitting on my desk making me smile.
The snow didn't last into the afternoon but the forecasters have put this part of the UK on a yellow weather warning because we are expecting "The Beast from the East" a bad weather front from Russia - wonder if they will manage to get that forecast correct....................................................
I woke up Tuesday morning to a dusting of snow all over the back garden, driveway & car but at the front of the house all there was was a small patch on the path - not a flake to be seen on the grass or the pavement on my side of the road. A glance across the road showed the pavement and front gardens covered in a good dusting of the stuff...obviously to do with the direction the wind was blowing.
Before the 2012 Olympics all the stations on my branch-line had the platforms extended so they could accommodate 12 coach trains (???) we don't have any 12 coach services. As a result, the staff only clear the platforms of snow up to the 8 coach point...
...and this was the faint dusting of the white stuff that was left.
As my train passes through a lot of farmland, I tried to get a photo of the fields as some had snow & others didn't...
...the driver suddenly put on a spurt of speed and a tree got in the way on this one.
I did manage to get a picture of a covered field...
...but looking out from the train it was like looking at a patchwork quilt because there seemed no reason why some fields were covered and others weren't.
The lovely Virginia sent me some 12x12 Gilded Winter PPs so that I will be able to finish my storage box without faffing about trying to piece the 8x8 or 6x6 PPs that I have on the larger panels. She posted them on Monday and they were sitting waiting for me when I got home - hidden behind a pile of empty flower tubs. The pizza box contained a lovely selection of the PPs which will be perfect and it also contained this...
...isn't he the most fun piece of happy mail. I love my quirky, whacky bird - thank you so much Virginia, he is sitting on my desk making me smile.
The snow didn't last into the afternoon but the forecasters have put this part of the UK on a yellow weather warning because we are expecting "The Beast from the East" a bad weather front from Russia - wonder if they will manage to get that forecast correct....................................................
Sunday, 1 February 2015
Pinch, Punch...
...first of the month.
Do you remember meeting up with your friends on the way to school on the first day of a new month and chanting that followed by "No returns", before they had a chance to say it to you?
The response from them would be "A punch and a kick for being so quick" or something similar.
I've often wondered where this came from and found this on the web: "Pinch punch first of the month and no returns." This is accompanied by the person's pinching and punching the victim. It seems to have originated in the days when people believed in witches. Just as we throw a pinch of salt over our shoulder when we have spilt some, even today, some people claim that the 'pinch' element refers to a pinch of salt. In this instance, the pinch of salt was believed to weaken the witch's powers and the follow-up punch was to drive her away. The 'and no returns' element was supposed to prevent the victim responding by saying: "A kick and a flick for being so quick!" These words would also be accompanied by the appropriate actions if the first person failed to add the extra words!
So here we are on the 1st February.
January flew by with a serious lack of paper crafting so I thought I should put that right this month and have started off with making a start on another piece of storage.
As it was members weekend this weekend, I took advantage of my 30% discount and bought this...
...I bought the advent storage (Tivoli) at the last members weekend before Christmas but it was too close to the start of December to make a start on it and I didn't want to rush it and spoil the thing.
These storage kits come flat-packed with the glue needed to put them together and there are a variety of 'add-ons' that you can buy...dies to cut fancy panels for the drawer fronts, paints, papers, waxes, sealants and fancy handles. Or you can raid your own stash to decorate them how you wish.
The Verona has two different sizes of drawers and they can be arranged as the photo above shows or with the same size drawers directly above each other rather than staggered. The drawers come as flat pieces of grey-board, ready scored. All you have to do is fold up the sides and glue together...
...the packaging has even been designed so that you can slot a large and a small drawer into it so they are held firm & straight whilst drying. This worked fine for the larger drawer but the smaller ones just dropped straight through - I think my packaging was cut incorrectly but hey-ho, no big problem and the drawers were quickly assembled and ready for a coat of paint.
The top and bottom sections of the cabinet are constructed individually and are attached to the main body of the box later...
...this is great for painting purposes as the pieces are of a more manageable size to handle whilst slapping on the paint. I am going with white acrylic Chalk paint for my piece.
As most of the box gets covered, I'm still debating whether I need to give it a second coat. Especially as I will be using distress ink and gilding wax on the bits that show...still thinking about that.
I have decided to cover my box using the following PPs...
...unfortunately, I only have the 6x6 and 8x8 stacks so will need to do a bit of strategic paper piecing on the body of the box (I still can't think why I didn't get the 12x12 pad in this - oh well).
The kit comes with pre-cut grey-board panels to decorate and then attach to the box/drawers...
...this makes it very easy to cover the drawer fronts neatly (if you don't want to go to the extra expense of the die set) and the box panels cover the construction slots so you have a lovely smooth finish.
There is still a fair bit of painting to do so I'll show you more when that is done.
Happy first of the month........................................................................
Do you remember meeting up with your friends on the way to school on the first day of a new month and chanting that followed by "No returns", before they had a chance to say it to you?
The response from them would be "A punch and a kick for being so quick" or something similar.
I've often wondered where this came from and found this on the web: "Pinch punch first of the month and no returns." This is accompanied by the person's pinching and punching the victim. It seems to have originated in the days when people believed in witches. Just as we throw a pinch of salt over our shoulder when we have spilt some, even today, some people claim that the 'pinch' element refers to a pinch of salt. In this instance, the pinch of salt was believed to weaken the witch's powers and the follow-up punch was to drive her away. The 'and no returns' element was supposed to prevent the victim responding by saying: "A kick and a flick for being so quick!" These words would also be accompanied by the appropriate actions if the first person failed to add the extra words!
So here we are on the 1st February.
January flew by with a serious lack of paper crafting so I thought I should put that right this month and have started off with making a start on another piece of storage.
As it was members weekend this weekend, I took advantage of my 30% discount and bought this...
...I bought the advent storage (Tivoli) at the last members weekend before Christmas but it was too close to the start of December to make a start on it and I didn't want to rush it and spoil the thing.
These storage kits come flat-packed with the glue needed to put them together and there are a variety of 'add-ons' that you can buy...dies to cut fancy panels for the drawer fronts, paints, papers, waxes, sealants and fancy handles. Or you can raid your own stash to decorate them how you wish.
The Verona has two different sizes of drawers and they can be arranged as the photo above shows or with the same size drawers directly above each other rather than staggered. The drawers come as flat pieces of grey-board, ready scored. All you have to do is fold up the sides and glue together...
...the packaging has even been designed so that you can slot a large and a small drawer into it so they are held firm & straight whilst drying. This worked fine for the larger drawer but the smaller ones just dropped straight through - I think my packaging was cut incorrectly but hey-ho, no big problem and the drawers were quickly assembled and ready for a coat of paint.
The top and bottom sections of the cabinet are constructed individually and are attached to the main body of the box later...
...this is great for painting purposes as the pieces are of a more manageable size to handle whilst slapping on the paint. I am going with white acrylic Chalk paint for my piece.
As most of the box gets covered, I'm still debating whether I need to give it a second coat. Especially as I will be using distress ink and gilding wax on the bits that show...still thinking about that.
I have decided to cover my box using the following PPs...
...unfortunately, I only have the 6x6 and 8x8 stacks so will need to do a bit of strategic paper piecing on the body of the box (I still can't think why I didn't get the 12x12 pad in this - oh well).
The kit comes with pre-cut grey-board panels to decorate and then attach to the box/drawers...
...this makes it very easy to cover the drawer fronts neatly (if you don't want to go to the extra expense of the die set) and the box panels cover the construction slots so you have a lovely smooth finish.
There is still a fair bit of painting to do so I'll show you more when that is done.
Happy first of the month........................................................................
Subscribe to:
Posts (Atom)