Followers

Sunday, 24 March 2013

Thinking outside of...

...the box - a boardgame box to be precise.

When a colleague asked me to do a memory book for someone who had recently been promoted and would be moving to a new office, the first thing I asked was - are there any particular colours or themes you want used.

The reply was; "Funny you should say that but..."

The 'but' was that the book should be linked in some way to the game Cluedo as the leaver was known by the nickname 'Mrs White' and her closest friends/colleagues as 'Col. Mustard & Miss Scarlet'.

I didn't think that obtaining related images would be a problem (the web is a wonderful place...) but I thought it might be a bit difficult obtaining charms/embellishments in the "weapons of choice" - after all, how often do you need a lead pipe on a layout ???

Being slightly stumped for ideas I placed a question on the UKS forums asking if anyone had any ideas about Cluedo related stuff. I had been thinking along the lines of getting a travel size version of the game but having looked at them in the shops they seemed to be in a new print format and I really wanted the traditional style. Whilst looking at the new games a thought struck and my re-cycling tendancies came to mind.

A quick visit to a local charity shop and I came away with this...

...it cost me the grand sum of £1.99.
I had originally thought of photocopying the board at A3 size and using the paper to cover some chipboard/greyboard to make the covers but seeing the actual board I had another idea...

...and attacked it with a craft knife.
By cutting at the right point I created a cover just slightly larger than 8x8...

...it also meant that the inside of the covers were already lined with the actual playing board (or at least part of it).
This was the starting point for the memory album...

...a lovely textured board set of covers.

This is how it ended up...

...the polkadot washii tape finished off the edges (hiding the fact that there were cut edges) and the book-rings will allow the person receiving the book to add other bits if they so wish.

I'll show you the inside of the book in another post - be warned it will be photo-heavy and you'll probably need to grab a cuppa before you start LOL

I wonder how many of you have old boardgames tucked away in the cupboard...pieces missing so you can't actually play the game but you have never gotten around to throwing them out ???

Now obviously my £1.99 at the charity shop did not get me a complete game but the board was there and in very good condition. There was a complete set of game cards which have been very useful as embellishments and there were 'some' of the playing pieces. What have you got in the cupboard that you could use?

Howabout creating a mini album using the pieces from a boardgame to hold Christmas photos - in our family we always had a new boardgame every Christmas and we sat down as a family after lunch to play the new game. Wouldn't it be great to pull out those photos and place them in a 'themed' album?

The game might come in a box but it is amazing what you can come up with if you think outside of it.........................................................

Saturday, 23 March 2013

Rocking your World Friday...

...is three years old **toot-toot**

For those of you dropping by who haven't got a clue what I'm on about (nothing new there then LOL) just hop on over to the lovely Virginia's Blog where she will tell you all about it as she kindly hosts the weekly gathering of 'Rockettes' who take a look back at their week and share their positive moments...you might even decide that you want to join in.

I've been AWOL for a few weeks but Virginia says that's okay as we all have lives that 'get in the way' from time to time.

Work has been rather stressful for some time now so it hasn't made for a great background for trying to pick out the positives of my life but I decided it was time to get a grip and dig deep otherwise I would never get back on here...so here goes...

This is a mish-mash of the last few weeks all rolled into one.

Spent a whole day with some crafting friends at one of Andy Pearson's "Tim Holtz Style" workshops - lovely messy day (yes, I know I don't 'do' messy but I always go prepared - pinny, gloves, babywipes LOL) and we got to stay in the warm 'playing' whilst it was pretty awful weather outside.

Have had several mentions on the 'Blog-bits' section of UKS in recent weeks - it is such a lovely feeling when someone thinks what you have blogged about was worthy of mention on a national forum.

Decided to do a bit of sprucing up on the old home-front - the Dulux offer of 3 testerpots for £1 has been great and has allowed me to add a bit of colour here and there without splashing out huge amounts on big tins of paint that will go to waste.

Treated myself to a lovely lime green kettle to add a bit of 'zing' to the kitchen - it looks so lovely and cheerful first thing in the morning, irrespective of what the weather is doing outside...think I'll be adding the matching toaster.

Had another lovely day with a crafting friend at an Andy Skinner workshop held at the Artistic Stamper - am I glad it was last weekend and it was only raining...if it had been today it would have been SNOW.

Had a bit of fun at work for Red Nose Day. This year we didn't make such a big thing of it as we have been so busy but we still managed to raise over £100.

Had to travel to Luton yesterday for a meeting (not a positive) and whilst waiting for a connecting train spent some time drooling in the Cath Kidtson shop at St. Pancras station...drooling was about all I could manage - those prices EEK!!! Despite being very cold at least the snow held off so the journey was fairly un-eventful until the last leg home. The ticket wouldn't work in the barrier and some jobsworth told me I would have to go and use the Underground (tube/metro/subway) to complete my journey even though I had the booking document with me showing the route I was entitled to use (the underground would have meant 3 changes - the route I was supposed to be on was just one stop on a highspeed train). His arguing caused me to miss a train but a colleague stepped in and allowed me through the barrier so I didn't lose too much time completing my journey.

Not a lot there, but I did say I needed to dig deep. Do hop over and pay Virginia a visit and also pay a visit to the other 'Rockettes' playing along this week - it can be very uplifting. Hope to see you there........................

Wednesday, 20 March 2013

Quick update...

...on the Bloglovin' situation.

Well I seem to have managed things okay and I even got my first 'Daily email' but somewhere along the line I seem to have lost 12 folk that I follow?????????????

Sorry!!!!!!!!!!!!!!!!!!

I will need to sit down and go through my Reader list and compare it to the list that is in Bloglovin' so I know what I need to 'add'.

No idea what-so-ever how that happened (although I surprised myself managing to get most of the blog list installed LOL) but at least I've a few months to get things sorted **giggle - me and IT - rollseyes**

Follow my blog with Bloglovin

Hope you all have a good day.................................................

Tuesday, 19 March 2013

Bloglovin...

...now this could be interesting rollseyes

You all know I'm not very techy but I've been seeing stuff on other folks blogs about the fact that Google reader is being withdrawn so we won't have the current 'follower' functions that we have at the moment. So I've taken the plunge and am trying to sort out my links to this new "Bloglovin" facility.

I think I've managed to import all the blogs that I follow and I hope that if you currently follow me you will continue to do so...

Follow my blog with Bloglovin

Keep your fingers crossed for me folks because I really don't have a clue what I'm doing and hope that this all works okay (I seem to have managed the import and the installing of some buttons so there's hope for me yet)...keep 'em crossed pleased...........................................................

Saturday, 16 March 2013

Just let me say...

...for someone who doesn't "do" mucky - I seem to spend a lot of time doing just that LOL

A while back my friend Suzie asked if I'd like to go with her to the Artistic Stamper in Faversham (Kent) as they were holding an Andy Skinner workshop. Having been to one of his demo days I didn't need to be asked twice.

The project for the day started as a bare Tando Creative Large Carriage Clock.

Oooooooooooo we had fun playing with some super Deco-art products that I hadn't seen (and certainly couldn't pronounce the name of in some cases **giggle**). There were 7 of us and as you can see, we all created something very different to look at.

These were all the finished clocks - and they are real working clocks.

Here are mine and Suzie's...

...Suzie went for her favourite colour - lavender, and I went for a red/burgandy shade to go in my study.

No sooner was I home than I was rummaging in the drawer for a battery...

...and with a bit of quick hammer work it was up on the wall.

You might have noticed that I added something that wasn't there in the workshop photos...

...the compass pieces didn't look quite 'finished' so I added a cog from the Chronology range. I just love all the textures we were able to add to this piece - all with the use of some embossing folders and a Big Shot.

I had a wonderful time and I absolutely love my new clock.

Whilst at the Artistic Stamper I bought another clock kit and I'll be having a play just as soon as I decide what colour I want to do this one..........................................

Saturday, 9 March 2013

Mucky playtime...

...and boy was it fun.

I have been looking forward to today's class at Pinnacle Crafts - one of Andy's "Tim" stylie days.

We all started off with one of these...

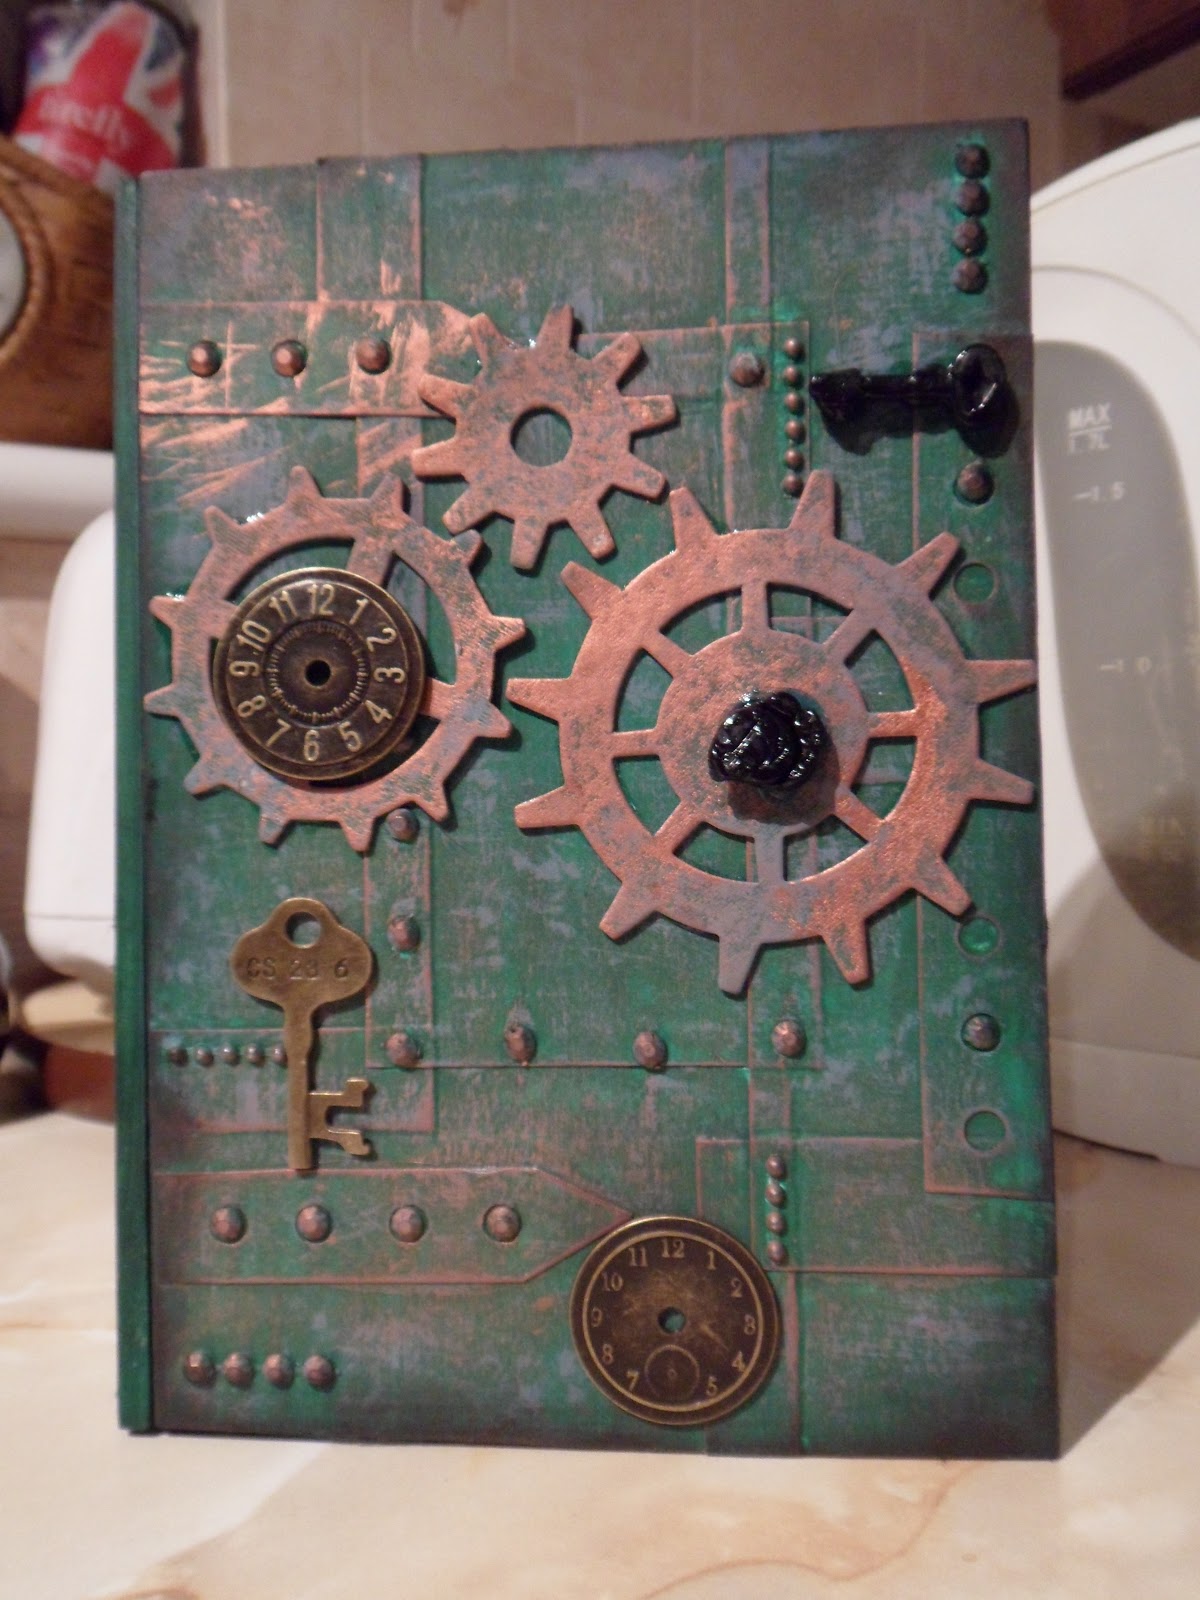
...a bare wood book-style box.

At this point I have to apologise as I forgot to take some photos of the first stage which was to cover the book-cover with random sized panels of white card, some punched card strips and some sticky back gems. The idea was to create a look of metal plates rivited together.

I used dark green acrylic paint to cover my box...

...and then dry-brushed some grey-blue paint over the surface to give a distressed look.
As the card panels were stuck on we scored where they overlapped...

...which as you can see, along with the gems gives a super textured finish.
I then highlighted the panels on the box further...

...by dry-brushing with copper 'mixative' alcohol ink.
A selection of die-cut cogs were painted using the same colours...

...but I used a bit more of the grey-blue colour and quite a lot of the copper so that the cogs would show more clearly when attached to the box.
To give it a more 'aged' effect the edges were rubbed with...

...black soot Distress Ink.
We had a play with embossing powders and moulds...

...and applied the decorations to the box.
When I got home I added some more embellies...

...sorry about the fuzzy pic.
These metal embellies are from...

...the Papermania "Chronology" range.
This is the back of the box...

...with a selection of Chronology Clock faces.
Although the piece looks like a book...

...the spine pulls out a hidden drawer (I think I might line this but I'm not sure - will have to give it a bit of thought).
This is the front of the finished item...

...die-cut cogs, UTEE moulded shapes, Chronology clock faces and a key.

Another super day playing - thank you so much Andy, I loved every minute of it as did my friend Suzie.

I wonder what he'll come up with the next time we have a 'Tim style' day..........................................

Wednesday, 6 March 2013

Now grab your "Gear"...

...it's time to play.

Keeping it simple, I thought I'd show you what the Inkadinkadoo Stamping Gear does.

This is the basic Starter set...
...it comes all nicely packaged but please be warned - it is near impossible to get the products out of the packaging without completely demolishing it...shame...as the packing has some examples and is a neat little container that would have been ideal until you decide on some other form of storage.

The plastic 'shells' that contain the pieces are deadly - watch those fingers!!!

In the starter set you get...
...the small round cog, the stamp paddle and a set of stamps. This will cost you about £16.

There are about a dozen additional packs of stamps that you can buy...
...the one you see here is called "Celestial". Stamp packs are about £6.

You don't have to stick to the Inkadinkadoo stamps. If you have foam mounted stamps or put some E Z mount on your clear stamps you can use more or less anything you have. The only restriction is the size of the 'paddle' and the thickness of the stamp...
...as you can see, the 'purpose' stamps are quite thick and they need to be as there is a lip on the paddle that you need to clear in order to be able to stamp your image.

This is the paddle...
...it has some grid markings on it to help you line up your stamps.

I have used a Memento ink pad...
...on this occasion I have stuck with Tuxedo Black but there is now a super range of colours which make playing with this item really fun (you can mix & match colours to your heart's content).

To start, you place your cog where you wish to stamp and hold it in place with a finger on the top...
...the cog has slots all around it and the paddle has a point either end that slots into these notches.

Do take some time thinking where you want to place your image - you would be surprised how big a circle even a small stamp can create. You don't want to be disappearing off the page if you were hoping to create a perfect circle. Mind you, stamping off the page gives a great effect too...but only if that was what you wanted.

Continue 'sloting' and stamping until you have completed your design...
...as I said, on this occasion I have only used black but you can still create shading. As you work your way around the cog you can stamp-move-second stamp - then re-ink and repeat. This gives you a shaded effect. You can play by 'stamping off' a third or fourth time just be aware that this cog has 16 slots so if you want the effect to be even you need to consider whether your number goes into 16 evenly. Random 'stamping off' can look good too but only if that is what you want.

Once you have completed your design you can mount a topper or a sentiment in the centre...
...I have just stamped in the middle. This particular design is about 8x8ins so you need to keep that in mind for card making...but how about creating your own scrapbook page backgrounds?

I'm looking forward to having a good play - why don't you have a go too................................