...the Andy Pearson (Pinnacle Crafts) way.
Starting with a piece of 300gsm Kraft card (8x8) and a spritz bottle containing a water/glycerine mix the card was sprayed on both sides and the moisture worked into the card using nothing more complex than fingers. When the card had become nicely pliable...
...it was scrunched up to give more of a chamois effect.
After carefully un-scrunching the CS it was sprayed on both sides...
...using Artist mica ink sprays in...
...Black night, Hematite, Mint, White. The CS was then ironed to dry it...
...but it still retained the creases.
The CS was then embossed...
...I used this pretty all over rose design but for the life of me I can't remember the make.
Gilding wax was used to highlight some of the areas...
...I used Spice, Verdi gris, Rich copper, Silver pearl.
The faux leather panel was sprayed with Spray & shine to stop the mica coming off, then trimmed & mounted onto some gold miri card. It was then mounted onto an 8x8 card blank...
...and I matched some rosebuds to the waxed highlights...
...the peachy colour worked well with the spice & rich copper wax.
I like the stems on my flowers to be spiralled so Andy was off raiding Pauline's craft stash for a knitting needle...
...all the single buds were spiralled but I left the bunch with straight but shortened stems.
Thank you Andy for sharing a very enjoyable technique with us - it was a fab class.
I have left my card without a sentiment or any other decoration as that way it can be adapted for any occasion that I wish to use it for.
Although there were only 3 of us in the class learning about faux leather & metal, it was a very pleasant day and a week later I was sitting watching Andy demo these techniques during his Embossing/Stencils/Masks event. Despite a numb-bum from sitting so long, it was great making notes about the faux techniques that we had played with and gave me a chance to note a few more ideas that Andy shared with us.
A great start and end to my week off work.................................................................
Sunday, 27 April 2014
Thursday, 24 April 2014
Nicecrane Design images...
...with ideas & freebies from magazines.
How often do you pick up a magazine because you were attracted by the cover gift but then never actually use the gift?
I think it is something that many crafters find themselves doing.
Well, today I bought two magazines whilst out shopping with Mum - Simply Cards & Papercrafts and Quick Cards made Easy. These are two magazines that I buy regularly but I was particularly attracted to the fact that "Simply" had a set of IndigoBlu stamps as the cover gift...
...and I rather like this brand. I had also seen the head with the flowing hair before and seen it used with gilding flakes to great effect.
Ignacio had sent me a set of animal digi images...
...and I had already used the cute little 'Hedgie'. However, I had also been colouring a couple of the other images...
...as you can see here. Both had been coloured using Spectrum Noir pens. What I needed was an idea for using the completed images.
As I was browsing through "Quick Cards" I came across some instructions for a multi-fold card which I thought looked interesting...
...and so with a bit of scoring, folding & cutting I had my base card. The magazine showed lots of examples with panels of PP stuck in strips all over the card but that wasn't what I wanted.
Then the penny-dropped.
I had been looking at the freebie stamps and the more I looked at the 'head' the more I saw grass and shrubbery. So just inking up the hair...
...I repeat stamped across the bottom of the card using alternating Adirondack ink pads in "Latte" and "Pebble". I also stamped the sentiment from the freebie set in Adirondack "Espresso" then cut it out using a deckle-edge blade on my paper trimmer.
The edge of the sentiment panel was inked with Ranger Distress Ink in "antique linen" before being mounted on the left-hand front panel of the card using 3D foam pads...
...the image of the bunnies with the banner has also been inked with antique linen and mounted on the inside back panel (the banner can be used to write the message in). I then rough-cut the field mouse...
...and mounted it on the right-hand front panel. Once again using 3D foam.
This is the finished card...
...although it is very dimensional, it actually folds very flat which makes it ideal for posting.
This set if digi-stamps is one of Ignacio's new sheets over at Nicecrane Designs. "Animals Around Us" is a lovely sheet of images that were a delight to colour. If you would like to see what some of the other DT members have been up to, do hop on over to the Nicecrane blog. There is such a variety of work to be seen vintage images of large flowers, oriental images, vintage postcards...children, animals, buildings...there is so much to see and inspire.
So I'm feeling quite chuffed with myself at the moment. I've made use of a magazine freebie. I've tried a new style of card using the instructions from another magazine and I've used some more of Ignacio's adorable images.......................................
Labels:
cards,
crafts,
Design Team,
digi,
distress markers,
inks,
scoring,
Spectrum,
stamping
Monday, 21 April 2014
It seemed like a good idea...
...at the time.
Not the fact that I was booked onto one of Andy's classes (Pinnacle Crafts) or that I was meeting up with Hilary for breakfast - no, they were great ideas. The problem arose from my choice of embossing folder - but let me start at the beginning.
The class on Saturday was to experiment with 'faux finishes' and one of the pieces was to create a look of metal. Andy had posted a couple of finished pieces on the Pinnacle blog but decided we would go with another box - totally logical as it happened to be Easter weekend and the finished item could be used to house an Easter gift (pretty good size for loads of chocolate LOL).
Andy's sample box was created using the Spellbinders Labels 34 (? I think) embossing folder...
...and he gave it a pewter/gunmetal type finish - isn't it pretty.
Now it is easy to want to stick to what the sample project has been made with but me being me, I went for something different...
...I went with the Celtic knot embossing folder and that is where the problems started. I know that you should never assume that all folders/dies etc. will work with the same 'sandwich' in your cutting machine but to be honest, I didn't even give it a thought. Even the fact that the hinge was broken on the Celtic knot folder didn't put me off.
Because we had a lot of embossing to do, Andy had set up the electronic Big Shot. Good job there were only 3 of us in the class because when it came to my turn to emboss a panel - the machine jammed. Out came the Grand Calibre and the other ladies continued whilst Andy & I tried to get the folder out of the Big Shot. Success! Which meant the other ladies could return to the electronic machine and I tried the GC...that didn't want to 'play' either but I eventually got the required number of embossed panels - see, I can be stubborn when it comes to things like this LOL
Having started with silver miri card, the next thing was to decide on colours...
...I went with Coffee Archival Ink and Eden Green StazOn. Hilary decided to use reds and Sue went with purples whilst Andy went with golden colours.
The coffee colour was sponged onto the panels giving it a golden tone rather than brown...
...and then the green was swiped over the high points of the design.
I don't think it was my day as far as the box was concerned because it didn't want to stick together...
...Andy to the rescue - he stuck the main part of the box whilst I constructed the lid...
...ink pads come in handy for weighing things down to help the sticking process.
We had silver butterflies cut to use as decorations...
...and they were coloured to match the box along with some flourishes - I still can't decide whether to actually put them on or leave the box plain.
The ink certainly makes the design quite bold on this...
...and the 'knot' is a focal point...
...which makes me feel that it doesn't really need the butterflies.
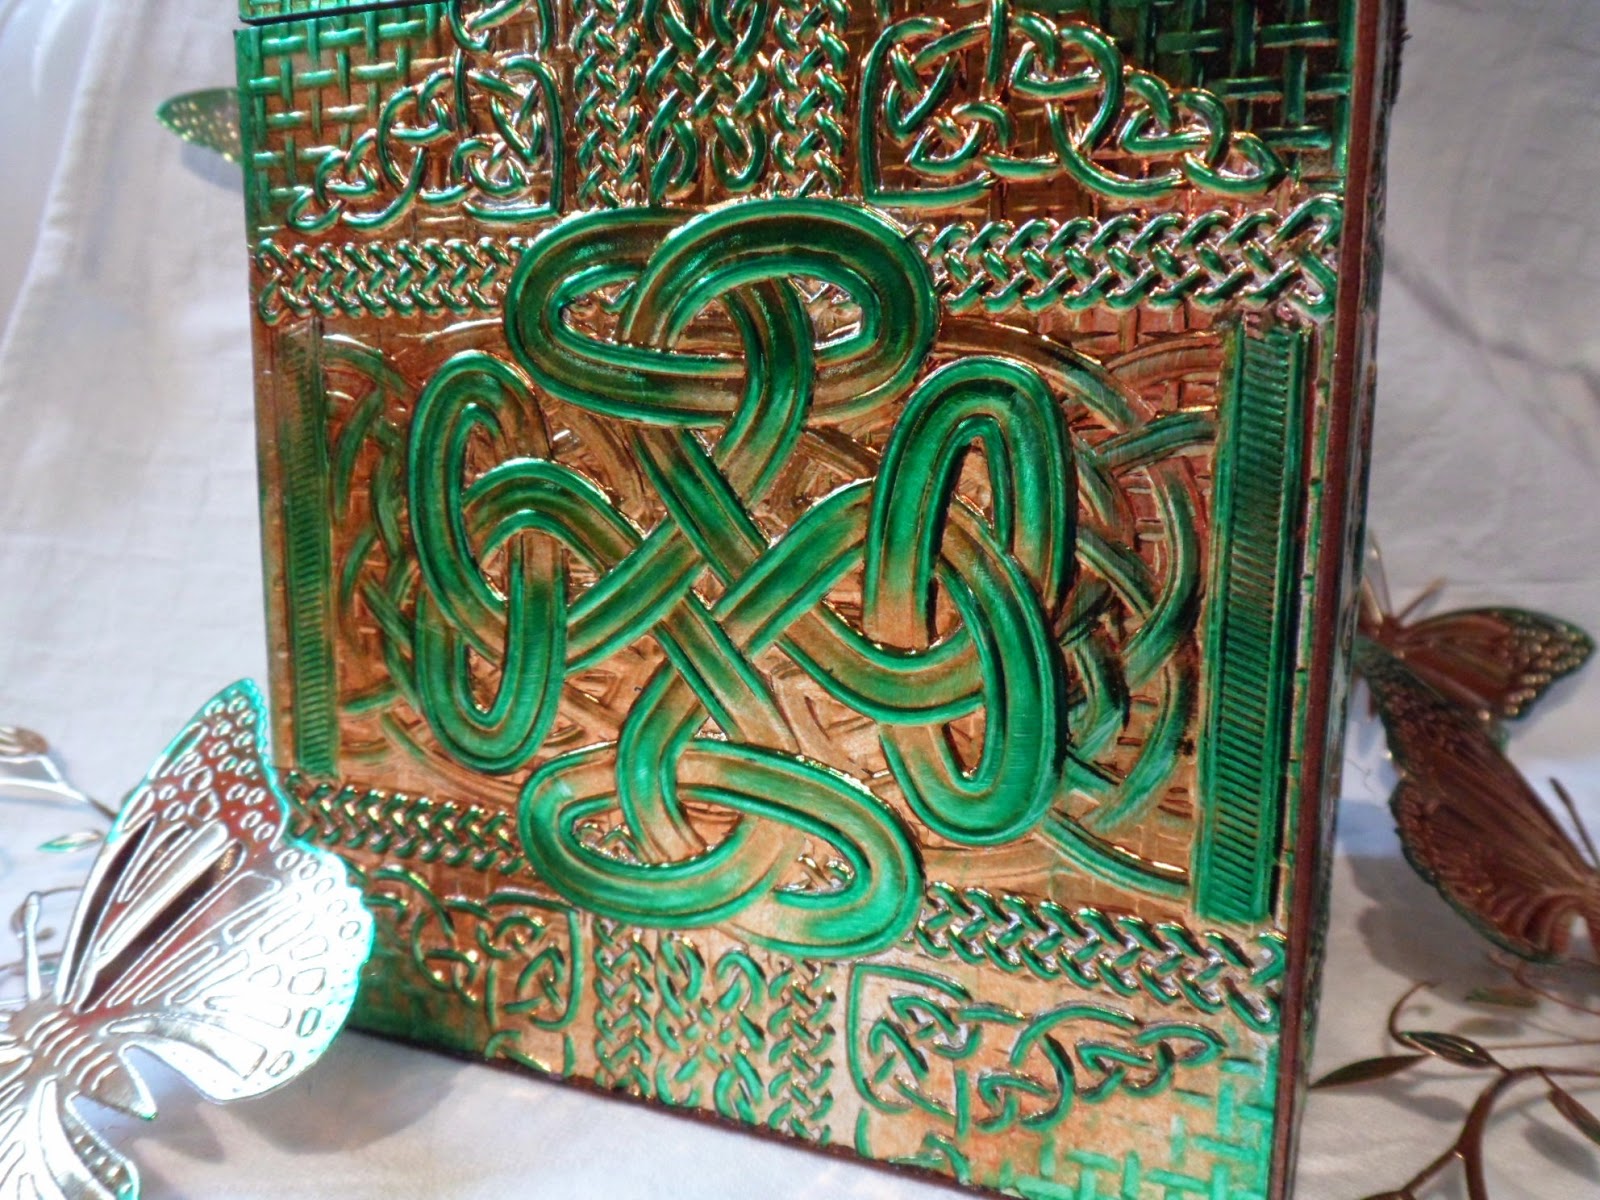
This was the finished box...
...which is 5" wide and 6" high. By embossing pieces of miri cut to 5x7 and centring the design it was possible to create the edges of the lid so that they would match up with the body of the box. Not all embossing folders have a design that will allow this without spoiling the main part of the pattern but there are plenty that do.
So I have my 'faux' metal box and had a fun day crafting - I'll show you the 'faux' leather in another post.
Thank you for a great day Andy - and thank you even more for putting up with all the problems I created (sorry!).............................................................
Sunday, 20 April 2014
Happy Easter...
...to you all.
I finished colouring my cute little 'Hedgie' from Nicecrane Designs (shown in previous post) and here he is...
...sitting amongst my Easter gifts that will be delivered later...
...I wanted him finished so that I could use him as a gift card in this egg basket...
...tucked in amongst the eggs. I cut the image using a Spellbinders scalloped oval die then embossed it and inked the edges with Ranger distress ink - antique linen.
Fingers crossed the weather behaves for the weekend (forecast isn't brilliant) and everyone is able to take advantage of the extra couple of days.
Don't eat too many chocy eggs...........................................................................................
I finished colouring my cute little 'Hedgie' from Nicecrane Designs (shown in previous post) and here he is...
...sitting amongst my Easter gifts that will be delivered later...
...I wanted him finished so that I could use him as a gift card in this egg basket...
...tucked in amongst the eggs. I cut the image using a Spellbinders scalloped oval die then embossed it and inked the edges with Ranger distress ink - antique linen.
Fingers crossed the weather behaves for the weekend (forecast isn't brilliant) and everyone is able to take advantage of the extra couple of days.
Happy
Easter
Don't eat too many chocy eggs...........................................................................................
Friday, 18 April 2014
Springtime & Books...
...and more colouring.
I love books!
I was brought up to enjoy and look after my books and I have an amazing collection of hardback, paperback, fiction and non-fiction books. I also love art and although I have never been one able to sit down with a blank page and create something totally out of my head; art was one of my best subjects at school and I wasn't bad at sketching.
In 1977, I had been at work for about two years when the media were full of the fact that a book was being released containing a reproduction of Edith Holden's nature diary - The Country Diary of an Edwardian Lady...
...as you can see from this snap of my book shelves, it wasn't to be the only book published containing this lady's wonderful artwork.
The Country Diary of an Edwardian Lady was one of my first 'grown-up' book purchases...
...and despite it being well read, it looks almost as it did when I first brought it home.
Books are treasures and should be treated as such.
Ignacio (Nicecrane Designs) has recently released a lot of Springtime image sheets, amongst them have been some Edith Holden images which are all wonderful but...
...when he asked me to work with this sheet, I couldn't say no. The images are in the same style...
...just look at these cute little bunnies and what about this one...
...this image is adorable and I just had to make a start.
If you would like to grab this design sheet, it can be found here. (**link to be added**)
My little 'Hedgie' still needs to be coloured but I already have an idea how I'm going to use the image once finished. Do pop back to see what I come up with.
If you would like some more Spring/Easter inspiration, hop on over to the Nicecrane blog to see what the DT have been creating........................................................................
Thursday, 17 April 2014
Soon be Easter...
...and I can't wait.
Not because of the thought of chocolate Easter Eggs or Hot Cross Buns. No! Just because it heralds a whole week off work...yipeeeeeeeeeeeeeeeeee!!!
This last two weeks have been exhausting.
Last week saw me having to stay away for two days (luckily only one night) as it was the review of staff performance for the past year. At least I didn't have to travel both days as three of us were given the option to stay-over. I really don't think I could have managed two pre-dawn set offs on the trot.
After a very tiring first day a couple of colleagues who were driving, kindly dropped us off at the Travel Lodge we had been booked into (sorry, didn't even think about getting a photo of the front entrance). Considering how close this TL is to the M11 motorway and Stansted airport, it was surprisingly quiet.
As with all TLs the rooms are very basic...
...a bed...
...a TV, chair and tea/coffee making facilities...
...a basic bath/shower...
...hand basin & loo.
The view from the window was quite pleasant...
...Spring flowers...
...trees and green fields - so very different from the TL in Cambridge.
This was the view to the right...
...which just showed part of the building.
Now this I just couldn't get a good shot of and I didn't have time to go wandering to investigate...
...I haven't a clue what that is behind the fence in the foreground.
All three of us were on the ground floor and being tired we had agreed to an early dinner then an early night as a 'driving colleague' was picking us up at 8.30am the next morning.
Two of us were in adjacent rooms and we both had problems with continuously flushing loos. My colleague was able to get hers to stop by pressing the flush a couple of times but mine didn't want to play ball - so on the way to dinner the problem was reported and I was assured it would be dealt with.
Dinner was pleasant because of the company but nothing to write-home-about as far as the food was concerned. We weren't too bothered because we were tired and we had all had a very long day.
Back at my room everything was lovely and quiet - the loo had been fixed.
The thing I dislike about the bathrooms in these places is that they don't have windows so they have extractor fans - and mine decided it wanted to imitate a 747 taking off (boy was it noisy). So a quick shower and out so that the light/extractor could be switched off.
Watching the news before 'lights out' I noticed a noise getting louder from the bathroom - it sounded rather like the end of a washing machine cycle when the pump is getting rid of the last bit of water...but this didn't stop. I shut the door but the noise was getting louder. I crammed a pillow over my head but the noise was getting louder.
By 11.30pm I couldn't stand it any longer so got dressed and wandered down to reception (these places don't have phones in the rooms) and the night-clerk came to see if she could sort something out.
An hour later I was heading off to another room with bags & baggage roughly packed - just wanting somewhere quiet to go to sleep.
The only available room was the next floor up and the other end of the building...
...looking out the next morning, I could see the room I had started in...
...the very last window on the ground level.
At least I got a different view from the window...
...of the second room LOL
Dealing with the bathroom from hell when all you want to do is sleep is not fun and it made the second day of the meeting seem even longer than it actually was.
Back at work, things haven't been any better - work has been pouring in but due to leave & sick absence my limited resources have been extremely stretched.
My only fully trained & experienced member of staff has been very poorly and this has resulted in my two trainees having to try and take up the slack. I have to say they have made a sterling effort.
I think we are all looking forward to the long Easter weekend and I can't wait for my week off.
I've no plans for anything particular other than sourcing a replacement freezer - yes, mine died at the start of the week but that's a story for another time.
Happy Easter everyone...............................................................................
Sunday, 13 April 2014
Going Buggy...
...is having a Giveaway.
The lovely Enfys is having a giveaway of some goodies she brought back with her from her recent trip to the USA. Hop on over to her blog to take a look.
There are two different sets of goodies to be drawn depending on where in the World you are.
Do hop over there to take a look at how you could be in with a chance...and whilst you are there, take a look at the lovely cards she creates...........................................................
Monday, 7 April 2014
Time to share a card...
...and a freebie.
I showed you in the previous post this lovely image of a little miss holding a Windflower. It was a delight to colour and thought that I really should make it into a card.
There are two lovely sets of images that you can grab from the Nicecrane Design site.
This is the B/W digi-stamp sheet containing five charming images ready to be coloured...
...and if you would like your own set of images, you can get them here. Remember, as they are digital images you can print them onto the paper/cardstock of your choice and then colour them using your favourite medium. I use alcohol pens but you could use water colours, pencils - whatever you prefer.
However, I know that not everyone likes to colour - or perhaps doesn't have the time to do so...
...not to worry, because the design sheet comes in a pre-coloured version that you can grab here.
Now I mentioned making a card and here it is...
...and as the image was coloured in lavenders & purples, I decided to carry the colour scheme through to the body of the card. The base card is smooth white CS (A4 folded in half to create an A5 card) and the edges were inked with 'Wisteria' - a shade in the new Mixed Media ink pad range from Colorbox.
The background PP is from a 12x12 stack by DCWV. I roughed-up the edges and applied more of the wisteria ink...
...the leaf spray is a Memory Box die called Lavish Branch and I cut it in white CS and purple holographic miri card. The flower is constructed from the two smallest pieces cut by the Sizzix "Tattered Floral" die - more inking on the edges and held together with a brad. The sparkly droplets are sticky-backed domes from Papermania.
The fancy corner in the top corner of the card is cut using a Tonic die - from the set "Deco Frame - Ivy". Again it was double cut and the two layers attached to the card slightly unevenly...
...the image itself was inked around the edge and attached to a matt of the purple miri card before being attached to the card.
That's my card creation but look what Ignacio was able to do digitally over on the Nicecrane Design blog...
...doesn't it look super.
Ignacio has also been very generous - remember I showed you this image in my last post...
...well, Ignacio has very kindly offered the image as a freebie - thank you so much Ignacio...
...just right-click on the image above and save . Windflowers come in lots of lovely colours so I would love to see what colour you decide to use on your version. Do please pop back and leave me a comment so that I can come and see what you have created with this lovely image...........................
Subscribe to:
Comments (Atom)




.jpg)
.jpg)


